
In this guide I will show you how to add navigation controls to the WooCommerce product gallery slider. The left and right arrows, just in case you are wondering. This is particularly helpful for themes which don’t support navigation controls. Navigation controls give your visitors more ways to browse between products, and gives you an opportunity to make other changes, such as removing the thumbnails below the gallery.
This guide involves only two steps. The first step is some custom PHP code in your theme functions.php file and the second is some custom CSS in your theme customiser >> additional CSS.
First, add some custom PHP code to your theme functions.php file of your child theme. This will add the navigation HTML to the gallery, but it will be an unstyled list.
/*
 * Snippet: How to add navigation controls to the WooCommerce product gallery slider 2026
 * Author: John Cook
 * URL: https://wcsuccessacademy.com/?p=789
 * Tested with WooCommerce 10.7.0
 */
add_filter( 'woocommerce_single_product_carousel_options', 'wcsuccess_woo_flexslider_navigation' );
function wcsuccess_woo_flexslider_navigation( $options ) {
    $options['directionNav'] = true;
    return $options;
}
Next add the following CSS to your theme customiser >> additional CSS. This will style the navigation into nice and usable buttons. You will notice that we are using native chevron arrows. If you prefer you may use either Dashicons or Fontawesome. Native chevron arrows were used in case Dashicons are disabled on the frontend and you prefer not to add an additional library to your website. Modify the CSS to suit your own design preferences.
/**
* Snippet: How to add navigation controls to the WooCommerce product gallery slider 2026
* Author: John Cook
* URL: https://wcsuccessacademy.com/?p=789
* Tested with WooCommerce 10.7.0
* "Nav control css"
*/
ul.flex-direction-nav {
position: absolute;
top: 30%;
z-index: 99999;
width: 100%;
left: 0;
margin: 0;
padding: 0px;
list-style: none;}
li.flex-nav-prev {
float: left;
}
li.flex-nav-next {
float: right;
}
a.flex-next {
visibility:hidden;
}
a.flex-prev {
visibility:hidden;
}
a.flex-next::after {
visibility:visible;
content: "\2771";
margin-right: 10px;
font-size: 20px;
font-weight: bold;
}
a.flex-prev::before {
visibility:visible;
content: '\2770';
margin-left: 10px;
font-size: 20px;
font-weight: bold;
}
ul.flex-direction-nav li a {
color: #ccc;
text-decoration:none;
}
ul.flex-direction-nav li a:hover {
text-decoration: none;
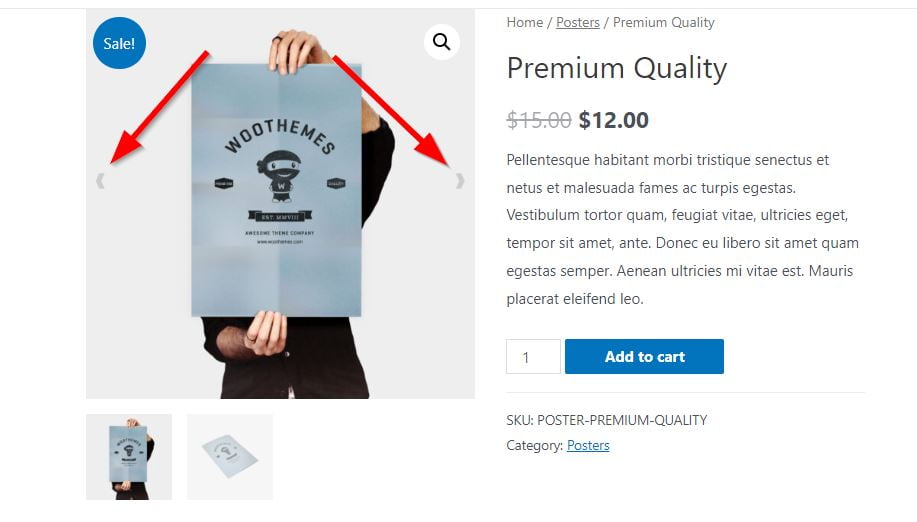
}When it’s done you should see two navigation arrows on your gallery similar to below
I have been working with WordPress and WooCommerce since 2012 and have developed a deep knowledge of the content management system. Since 2012, I have developed several plugins and designed dozens of websites utilising different frameworks, CMS’s and programming languages. I am proficient in PHP, Python, Java, C, C++, R and JavaScript with limited experience in Go, Kotlin and Swift.
Educationally, I have a Master’s degree in cyber security a Bachelor’s (Hons, First Class) in Applied Research and a Graduate Certificate in Data Science. I’m currently undertaking PhD studies investigating IoT cybersecurity. I recently graduated with First Class Honours and Masters of Information Technology, receiving the Executive Dean’s Award for studies undertaken in the 2021 and 2022 academic years. I have worked in the information technology industry for the past 11 years primarily as a software/web developer specific to design, optimisation, network management and security. My research interests are in the areas of Internet of Things (IoT), 5G and Beyond Networks, information security for wireless networks and software development.
Stay In Touch
