
How to create a WordPress child theme and customise it so that your WordPress website rocks it like never before. Before we go too far, although this is relatively simple, and if you follow our instructions you won’t have any problems, you must use caution with anything related to files in WordPress.
If you’ve been using WordPress for a little while you would have heard a child theme mentioned at least once. It’s often mentioned as a must have item for all WordPress websites. So what is a child theme?
A child theme is a clone of sorts of the main theme that allows you to make theme based changes without making those changes to the main installed theme. The child is completely dependant on the main theme to work. Without a main theme it simply will not allow you to activate it.
Using a child theme is a benefit when it comes to updating themes as any changes made to a theme will be lost during an update, so you’ll be right back at the beginning. You can use a child theme to make changes to the CSS, functions.php file, menus, headers, footers and single post pages, just to name a few.
So now you know what a child theme is, let’s begin the process.
How to create a WordPress child theme
Before we begin you’ll need one of two things. You must have access to either FTP or a file manager through CPanel. There are file manager plugins for WordPress, such as this plugin, that will allow you to access the files from the WordPress dashboard, but you should use caution when making changes from the dashboard to a live site.
A child theme requires three things to work. It needs its own folder, a style sheet and a functions.php file. The child theme will be located in the same folder as your main theme, usually wp-content/themes. For this guide I’ll be using one of the most popular and best selling themes on WordPress, Avada, which you can buy here.
Step 1.
Create a new folder in wp-content/themes. It’s good practice to call it the same as the parent theme but add child to the end of it. eg. Avada-child

You can use any name you want, but using the parent theme as the basis helps you remember what theme you are using as a parent. Make sure not to use any spaces in the folder name. Either make it one word or use a hyphen between words.
That was easy, wasn’t it? But we’re far from done yet
Step 2.
Now that the folder has been made you need to add a stylesheet. For those who don’t know what a stylesheet is, it gives the site its design and unique look. Everything from font usage through to borders and colors are set with the stylesheet. Without it your website will appear broken.
Open a text editor such as notepad or notepad++ on your PC and use the below code as a reference for your stylesheet.
[cc lang=”html”]
/*
Theme Name: Avada Child
Theme URI: http://example.com/avada-child/
description: >-
Avada Theme
Author: John Citizen
Author URI: http://example.com
Template: Avada
Version: 1.0.0
License: GNU General Public License v2 or later
License URI: http://www.gnu.org/licenses/gpl-2.0.html
Tags: light, dark, two-columns, right-sidebar, responsive-layout, accessibility-ready
Text Domain: avada-child
*/
[/cc]
Here’s what each part means:
- Theme name. This is the name that will be displayed for your theme in the WordPress back end.
- Theme URI. This points to the website or demonstration page of the theme at hand. You’ll find this on most WordPress themes. This or the author’s URI must be present in order for the theme to be accepted into the WordPress directory, but not necessary for a child theme.
- Description. This description of your theme will show up in the theme menu when you click on “Theme Details.” You can enter just about anything here for your own reference.
- Author. This is the author’s name. In this case it’s you, as you are creating the child theme.
- Author URI. You can put your website’s address here if you want.
- Template. This part is a must have. Here you put the name of the parent theme, meaning its folder name. Be aware that it is case-sensitive, and if you don’t put in the right information, you will receive an error message. Make sure that you double check this field.
- Version. This displays the version of your child theme. You would normally start with 1.0, but you can start with any number.
- License. This is the license of your child theme. WordPress themes in the directory are usually released under a GPL license; you should stick with the same license as your parent theme.
- License URI. This is the address where your theme’s license is explained. Again, stick with what your parent theme shows.
- Tags. The tags help others find your theme in the WordPress directory. Thus, if you include some, make sure they are relevant.
- Text domain. This part is used for internationalization and to make themes translatable. This should fit the “slug” of your theme.
Now that you have the text in a text editor, you need to add some information using the above information. This is important for the child theme to work correctly.
Step 3.
Now you need to edit the copied text so that it works with your theme. Don’t feel too overwhelmed because you only really need to enter two fields, theme name and template. It really is that simple. Your child theme stylesheet text can look as simple as this:
[cc lang=”html”]
/*
Theme Name: Avada Child
Template: Avada
*/
[/cc]
But it does look much better when you include more information, and it’s less confusing too. This is what mine looks like.
[cc lang=”html”]
/*
Theme Name: Avada Child
Theme URI: http://example.com/avada-child/
description: >-
Avada Theme
Author: John Citizen
Author URI: http://example.com
Template: Avada
Version: 1.0.0
License: GNU General Public License v2 or later
License URI: http://www.gnu.org/licenses/gpl-2.0.html
*/
[/cc]
Step 4
Save the text document as stylesheet.css. Notepad++. which is a free text editor will allow you to select the CSS extension.
Once saved upload it to the child theme folder.
Step 5.
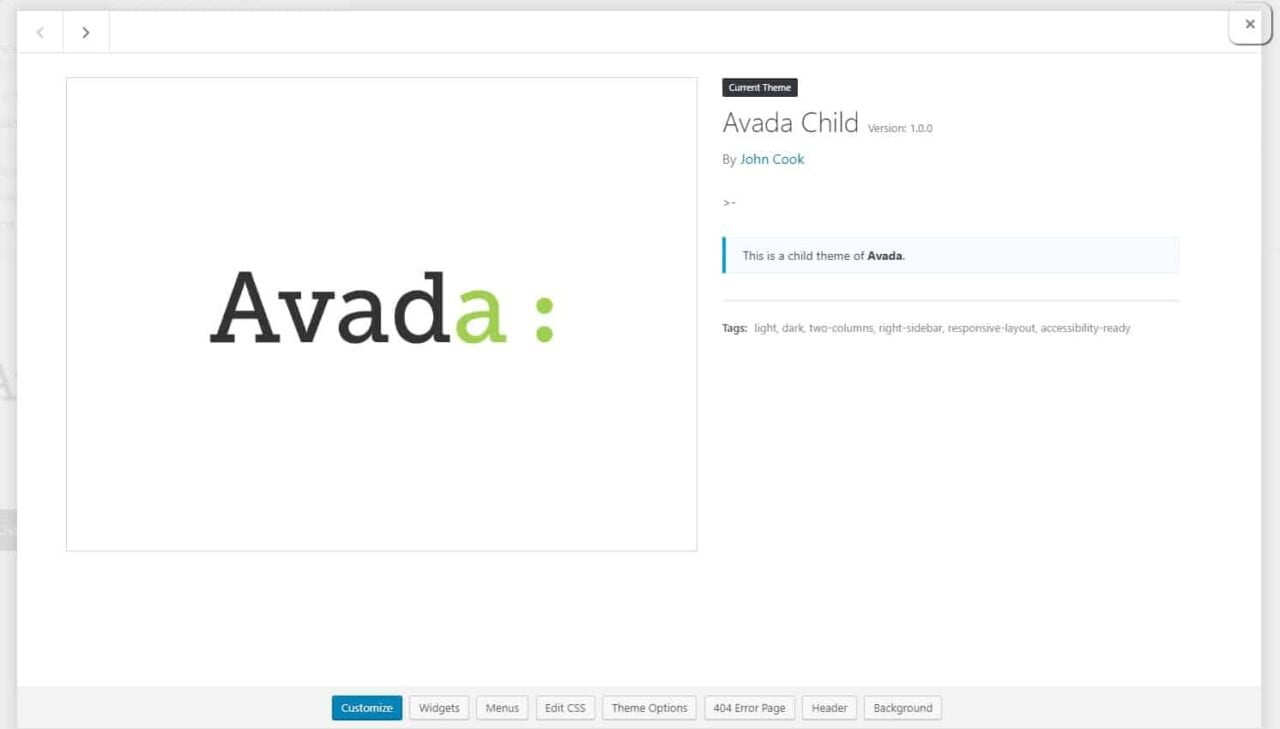
Go to your WordPress admin area and head to themes. Your child theme will now be visible. If you click on the details tab you will see the details of the header that you just uploaded. This is what mine looks like.
Step 6.
Now that the theme is installed, click activate. Congratulations. You’re nearly done. Your child theme is now working, but if you look at your website it will be very broken. We need to do just a little bit more before we’re finished.
Don’t panic. Everything is normal. The reason that the website looks broken is because it isn’t yet able to get all of the styles to make it look like normal. We will fix this next.
Step 7.
Open a text editor again and this time we will create a functions.php file. This will allow us to tie the child and parent theme together.
But apart from just tieing them together, it will allow you to place custom code snippets into the theme without losing them due to a theme update.
In your text editor enter the following and save it as functions.php.
[cc lang=”php”]
Step 8.
Open the functions.php file again and now we are going to add a few lined of code to make your site as pretty as it was before we started.
What we are going to do is enqueue the styles from the parent theme using wp_enqueue_style(). This is the new way of doing it and recommended by WordPress. It’s also the safest way.
In your functions.php enter the following just after the opening <?php tag. You can place it below the //*code goes here or overwrite that part.
[cc lang=”php”]
add_action( ‘wp_enqueue_scripts’, ‘enqueue_parent_styles’ );
function enqueue_parent_styles() {
wp_enqueue_style( ‘parent-style’, get_template_directory_uri().’/style.css’ );
}
[/cc]
Your functions file should look like this
[cc lang=”php”]
